Skip to content
Dreaming of waking up to naturally dark, gorgeous lashes without reaching for mascara every morning? Eyelash tinting might be the magic trick you’ve been looking for! This easy yet transformative treatment enhances your beauty, giving you that perfect look with zero effort every day. And guess what? You can get these fabulous results right at home!
“Eyelash tinting brings elegance, simplicity, and ease into your beauty routine.”
Picture this: No more smudged mascara, just beautiful, defined lashes that shine through swimming, workouts, or even happy tears. As you embark on your at-home eyelash tinting adventure, you’ll find a new level of confidence and undeniable allure.
Understanding Eyelash Tinting
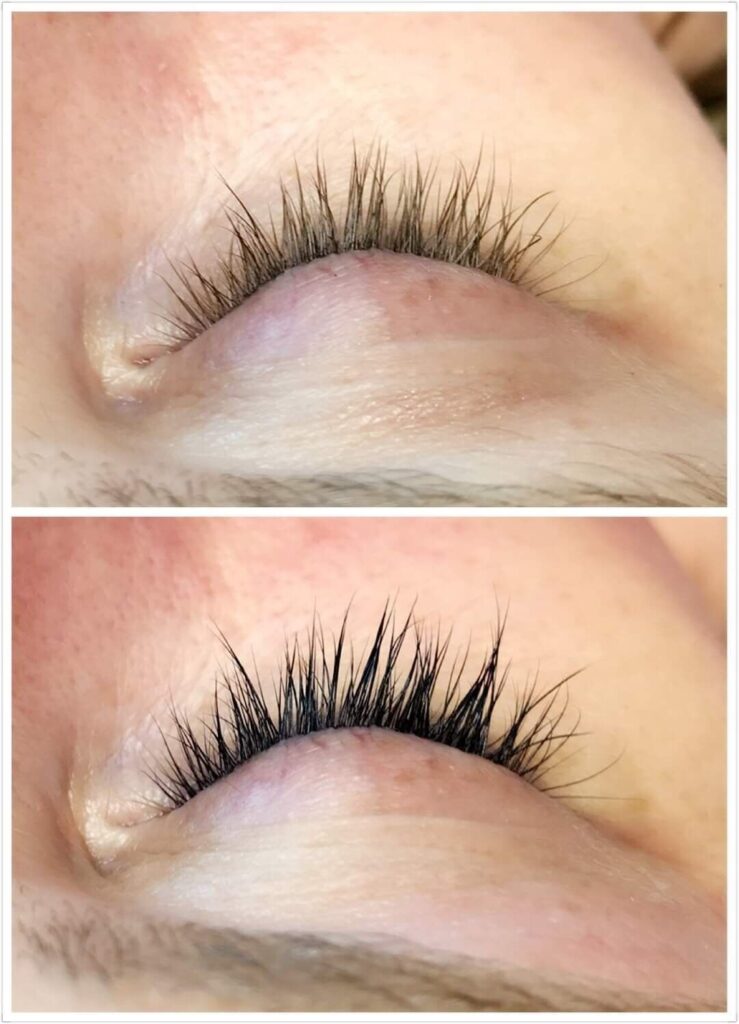
Eyelash tinting is a delightful beauty treatment that adds vibrant color to your natural lashes, making mascara a daily need of the past! Think of it like hair dye, but specially crafted to be safe for the tender area around your eyes. It’s perfect for anyone looking to make their eyes pop with just a little bit of effort, giving you that perfect splash of color.
The magic of eyelash tinting lies in its simplicity and its ability to give you a fuller, more defined lash line. By choosing to tint your lashes at home, you can achieve salon-worthy results right in your own bathroom. Whether you’re gearing up for a beach retreat where waterproof makeup is a must, or simply wish for striking lashes every morning, tinting is a fabulous long-lasting solution that fits seamlessly into a busy lifestyle.
As you step into this adventure of DIY eyelash enhancements, you’ll find that understanding the ins and outs of eyelash tinting empowers you to make smart choices about the products and methods that suit you best. It’s not just about adding color—it’s about boosting confidence and experiencing the delight of effortlessly enhanced beauty!
Why Tint Your Eyelashes?
Tinting your eyelashes is a true game-changer in beauty! 🌟
Picture this: Darker, fuller lashes greeting you every morning—no mascara needed! This not only amps up your beauty routine but saves you precious minutes, too. For those sizzling summer days or endless video calls, having tinted lashes means you stay effortlessly fabulous without a mascara meltdown.
If you’ve got lighter or thinner lashes, eyelash tinting is your new best friend! It dives deep, infusing each lash with vibrant color that lasts for weeks, boosting your eye game like never before.
The sheer charm of eyelash tinting is its simplicity. It’s an easy, effective beauty boost that’s perfect for everyone, including men who want a subtle touch-up! And by doing it yourself at home, you save big on salon visits—what a win!💸 So, why wait? Dive into the magical world of eyelash tinting today! 💖
Preparing Your Toolkit for Tinting
Ready to kick off your eyelash tinting adventure at home? Awesome! Assembling the perfect toolkit is your first mission. With the right gear, you’re all set for a seamless experience that feels just like a salon treat. 🎉
- Eyelash Tint Kit: Choose a trusted option like the Eylure Lash Tint Kit or the Strictly Professional Eyelash & Eyebrow Dye Tint Basic Tinting Kit. These have all you need, from color cream and gel activator to under-eye shields and applicator wands.
- Mixing Palette: Use the dimpled product trays to keep things mess-free and stain-free.
- Petroleum Jelly & Cotton Pads: Protect your skin with petroleum jelly and use cotton pads for easy cleanup.
- Spoolie & Q-tips: Perfect for precise application. Comb through your lashes with a spoolie and make adjustments with Q-tips.
- Tiny Comb: Have this handy for those final touches to your lashes.
Keep water nearby for mixing and rinsing. Fresh, dry lashes are the best starting point. With all these essentials, you’re ready to turn your lashes into something spectacular! ✨

Choosing the Right Eyelash Tinting Products
Choosing Your Lash Tint is a game-changer for your DIY beauty routine! Look for something that’s easy, safe, and gives amazing results each time. With options like the Eylure Lash Tint Kit or the Strictly Professional Eyelash & Eyebrow Dye Tint, be sure to pick what’s best for you!
Select a color that brings out your natural beauty. Love the subtle warmth of Dark Brown or the striking boldness of Black? Both offer unique vibes and levels of intensity. Make that choice and set your lashes up to dazzle!
If you have sensitive skin, check for hypoallergenic products or those without harsh chemicals. The Eylure Lash Tint Kit is known for being user-friendly and safe, perfect for everyone from first-timers to beauty pros.
Remember, convenience is key—a kit with all the tools and clear instructions can make the process a breeze. Start your journey to stunning lashes with products that match your style and comfort!
Step-by-Step Guide to Tinting Your Eyelashes at Home
Excited to boost your lash game without leaving your home? Follow this simple guide to achieve stunning at-home lash tint results.
- Get Your Materials Ready: Collect your tools: a lash tint kit, water, petroleum jelly, cotton pads, Q-tips, and a spoolie brush. Being prepared makes everything easier and more enjoyable!
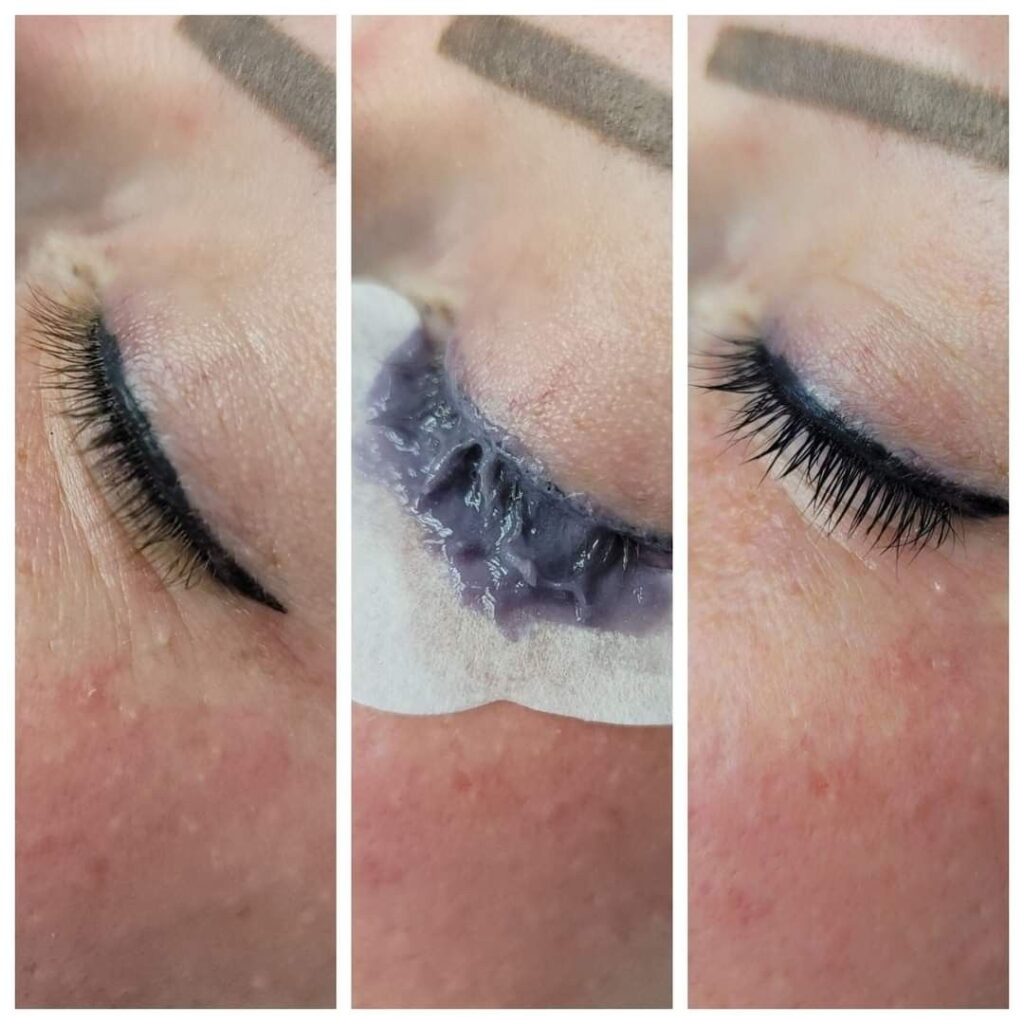
- Protect Your Skin: Spread a thin layer of petroleum jelly around your eyes. This protects your skin from any tint stains and guarantees a neat result.
- Mix the Tint: Follow the instructions on your tint kit. Often, this involves mixing equal parts color and developer until smooth, ensuring it’s ready to work its magic.
- Apply the Tint: Use the spoolie or applicator to coat your lashes evenly, starting from the base to the tips. This ensures every lash gets its fair share of tint!
- Time to Relax: Let the tint work for about 10–15 minutes. Take this time to wind down and enjoy a little “me time.”
- Remove the Tint: Gently wipe the tint off with a damp cotton pad. Ensure all tint is removed to reveal your beautifully enhanced lashes.
- Enjoy Your New Look: Check out the mirror to admire your chic, freshly tinted lashes. Bask in the glow of your DIY success!
Keep at it! With each try, you’ll become a lash-tinting pro, creating salon-worthy results every time!
Patch Test: Ensuring Your Safety
A patch test is your golden ticket to a smooth and worry-free lash tinting adventure! It’s crucial to make sure your skin is happy with the products you’ll use. Here’s a quick guide to mastering this important step:
- Grab Your Gear: Mix a tiny bit of the eyelash tint product just as you’re planning to use it. Start with a clean, dry area to keep your test site spotless.
- Apply with Care: Dab a little of the mixture on a hidden spot, like behind your ear or inside your elbow. These areas are discreet but sensitive enough to notice any reaction.
- Play the Waiting Game: Be patient for at least 48 hours. It’s worth the wait! Watch for any signs of redness, itching, or bumps.
See no reaction? Fantastic! You’re ready to dive into the full tinting process. If something unusual pops up, give a professional a call to ensure everything’s okay. Your safety is key, and these simple steps are your passport to an amazing tinting journey. Enjoy!

How to Apply Eyelash Tint Like a Pro
Applying eyelash tint at home can be a breeze! It’s a fantastic way to save time and enhance your natural beauty. Here’s how to get amazing results. 🎨
- ✨ Start Fresh: Make sure your lashes are squeaky clean. Remove any makeup or oils using an oil-free remover, and dry them well.
- 🛠️ Mix the Magic: Follow your kit’s instructions. With the Eylure Lash Tint Kit, use those handy dimples in the tray to avoid the mess. Mix until smooth.
- 🌟 Coat Your Lashes: Use the applicator to cover each lash from base to tip. If any tint ends up on your skin, use a wet cotton swab to clean it off.
- ⏰ Wait it Out: Leave the tint on for the time recommended, usually 10-15 minutes. Relax and keep those hands away from your eyes!
- 💧 Clean Up: Use a damp cotton pad to gently wipe off the tint, making sure to get all the residue without pulling at your lashes.
Voilà! With these easy steps, you can enjoy stunning, salon-quality lashes from the comfort of your home. Practice a bit, and you’ll perfect it in no time. 🌺
Dos and Don’ts of Eyelash Tinting
Starting your eyelash tinting adventure is exciting! With some simple tips, you’ll be creating stunning, colorful lashes at home. Here are the essential dos and don’ts for achieving professional results without leaving your house.
✅ Do: Perform a Patch Test
Always put your safety first. Perform a patch test 24 hours before tinting. Apply a tiny amount of the tint on your inner elbow and check for any reaction. Your skin will appreciate this precaution!
❌ Don’t: Forget Skin Protection
Apply a protective cream, like petroleum jelly, around your lash line to prevent dye stains on your skin. Keeping the dye on your lashes, and not on your skin, is a quick and easy fix!
✅ Do: Read and Follow Instructions
Instructions are your best friend! Read them carefully to understand how to apply the tint correctly and how long to leave it on. This ensures you get a perfect, even color.
❌ Don’t: Use Too Much Dye
A little dye is enough! Mix it properly and apply sparingly. This reduces the chance of the dye running into your eyes and keeps everything tidy.
✅ Do: Use a Timer
Set a timer! Ensure you leave the dye on for the right amount of time, usually 10-15 minutes. This helps achieve that vibrant, lasting color you’re aiming for.
❌ Don’t: Skip the Upper Lashes
Forgetting the upper lashes can result in uneven tinting. Ensure you coat both sides of your lashes to create that full, eye-catching look!
By following these dos and don’ts, you’ll enhance your beauty routine and keep your lashes looking fabulous. Enjoy every tinting session like a pro!

Common Mistakes to Avoid
🎯 Common Pitfalls to Dodge!
Patch Test is a Must! 🚨
Missing the patch test can spell trouble. Perform it 48 hours before applying the tint. Skin safety first!
Patience, Please! ⏳
Don’t rush it! Take your time, just like an artist perfecting their masterpiece. Speed can lead to mistakes.
Perfect Timing ⏰
Avoid leaving tint on too long. More time isn’t more color—it’s more irritation!
The Right Product 🎨
Choose eyelash-specific tints only. Stay away from regular colorants. Your lashes deserve the best!
Clean Canvas 🧼
Ensure eyes and lashes are free from makeup and oils. Clean lashes equal better results!
No Double Dyes 🚫
Never re-tint dyed eyelashes. Double-tinting can lead to brittle lashes.
Steer clear of these common mistakes, and you’ll soon flaunt gorgeous lashes with ease and confidence! 🌟
Aftercare Tips for Tinted Lashes
Way to Rock Those Gorgeous Lashes! Keeping them lush and vibrant is a breeze with these simple aftercare tips!
- 🚫 Skip Water: Steer clear of water and steam for the first 24 hours. This helps the tint settle in beautifully.
- 🛌 Gentle Sleep: Blot with care and try to sleep on your back. This avoids pressure on those enviable lashes!
- 🔄 Avoid Oils: Use oil-free products to keep that tint popping and prevent it from fading faster.
- 💧 Lash Love: Treat your lashes to a nourishing serum. It boosts strength and shine post-tint!
- 🎨 Easy on Mascara: Embrace your natural look or apply a light, water-based mascara for when you want an extra oomph!
With these easy tips, your tinted lashes will remain dazzling and ready to impress! Flaunt them and own that confident look!
Alternatives to Eyelash Tinting
If you’re considering alternatives to eyelash tinting, you’re in luck! There are several fantastic options to complement your beauty routine. One all-time fave is mascara. It’s a classic choice that gives dramatic results with every swipe. Choose long-lasting and volumizing types for instant lift and vibrant color.
- Lash Lift: This is a great way to enhance the curl and height of your natural lashes, making them look longer and more defined, no tint needed! Combine it with mascara for that perfect glam look every day!
- Castor Oil: Love going natural? Try castor oil. Its nourishing properties can help condition your lashes and might even promote growth over time for a fuller appearance.
- Magnetic Eyelashes: If convenience is what you need, these are a game-changer! With magnetized strips, they’re quick to apply and irritation-free, ideal for those special events when bold lashes are a must.
Each of these options offers its own benefits and can be a wonderful addition to your beauty kit—tailored to your personal style and lash desires!
Answers to Frequently Asked Questions
Is Eyelash Tinting Safe for Sensitive Eyes?
Absolutely! With the right product, even sensitive eyes can enjoy luscious, tinted lashes. Look for gentle formulas and always do a patch test to keep everything nice and safe. 🌼
How Long Should I Leave the Tint on My Lashes?
Just a quick 5-10 minutes and you’re good to go! Always check those instructions for exact timing and avoid any discomfort or overly dramatic looks. Remember, balance is key! ⏰
What Are the Benefits of Eyelash Tinting?
Skip the daily mascara grind! Tinting gives your lashes that wow-factor effortlessly. Imagine saving time in the morning with gorgeous lashes that stay put for weeks. No smudges, just stunning results! 💃
Can I Tint My Lashes If I Wear Contact Lenses?
You sure can! Just pop out those lenses before you start. Once done, give it a few minutes before popping them back in. Keep it comfy and clear! 👁️
How Often Should I Tint My Eyelashes?
Every 4-6 weeks is your magic number. This keeps your lashes looking vibrant and full of life, aligning perfectly with their natural growth cycle. Keep the allure going strong! ✨
Understanding Eyelash Tint Ingredients
Diving into the world of eyelash tinting is exciting, and knowing what’s inside those little bottles is super important! Eyelash tints often include colorants and activators to give you that dreamy mascara-free look. Most of these tints use vegetable-based dyes or henna, which are much safer than harsh chemicals.
Henna-based tints are a hit among careful beauty lovers, as they come from natural plants. If you’re sensitive to chemicals, henna might just be your perfect match. For synthetic options, choose tints with the least harsh ingredients to protect the skin around your eyes.
The key to making it all work is the activator or developer, usually with a bit of peroxide. This is what helps the color stick to your lashes. Be cautious, though, as it can sometimes irritate sensitive eyes, so a low peroxide level is best.
Before you dive in, make sure to closely check the ingredients on the label for any allergies. Remember, the patch test is your trusty sidekick here, helping you avoid surprises and ensuring a stunning lash makeover. With the right mix, your DIY lash tinting journey will be fabulous!
When to Consult a Professional
Tinting your eyelashes at home is exciting and budget-friendly, but sometimes calling in a pro is the best move! Here’s why:
- Feeling Uncertain? Not sure about the tools or worried about making a mess? A beautician can help with perfect application and share handy tips for DIY attempts later.
- Special Eye Concerns? Got sensitive eyes or complex conditions? A pro can choose the safest products and techniques just for you.
- Expecting a Baby? Unsure about tinting during pregnancy? Talking to your doctor and a professional can guide you to the safest choice.
DIY beauty projects are a blast, but sometimes expert advice is key. Keeping your eyes healthy and happy ensures your tinting journey is as fabulous as it can be!
Maintaining Your Tint Between Sessions
Achieving that perfect, sultry look is just the beginning! Maintain your tint between sessions to keep those mesmerizing lashes on point. A few smart strategies can help extend the life of your tint and keep your eyes dazzling.
- Daily Care: Use a gentle, oil-free cleanser for your face. Make sure it’s safe for eyes and won’t mess with your lash tint. Avoid rubbing your eyes too much to keep the color intact.
- Choose Products Wisely: Ditch oil-based removers and waterproof mascaras. These can weaken the tint over time.
- Moisturize: Apply a nourishing lash serum or conditioner before bed. Try a vitamin-rich oil like castor or almond oil for a natural hydration boost.
- Be Gentle: When using eyelash curlers, apply light pressure to keep the tint from wearing off. Protect your lashes with sunglasses in the sun to maintain their vibrant look.
With these simple steps, you can flaunt the elegance of your tinted lashes long after your DIY session. So, go ahead and flutter those exquisite lashes with confidence!
Conclusion
You’ve got all the insights and tips you need, ready to transform your lashes right from home! 🎉 Say hello to convenience, boosted confidence, and amazing-looking lashes without stepping outside. For extra help, personalized advice, or to discover top-notch products, don’t hesitate to reach out to the pros at UBLash. We’re excited to be part of your lash adventure. Enjoy your tinting experience! 💫