Skip to content
Lash mapping is the secret behind stunning eyelash extensions. It’s not just about using high-quality lashes or precise application. The real trick is in the plan—the lash mapping. This approach helps artists create custom extensions that highlight each client’s unique eye features. If you’re an eyelash extension specialist, mastering lash mapping can transform your service from ordinary to extraordinary.
“A well-mapped lash is like a masterfully tailored garment—it fits perfectly and looks stunning,” says Jane Doe, a renowned lash artist.
Whether you’re an expert or a newbie, knowing the details of lash mapping can boost your craft. You’ll learn how to pick the right curl, length, and tailor the style to suit different eye shapes. Curious to enhance your skill? Let’s dive into the art of lash mapping!
Lash Mapping Unveiled: The Secret to Stunning Lashes
Lash mapping is the key to turning eyelash extensions from simple to standout. It’s not just a method—it’s a craft that lets you customize and create the ideal look for each client.
- Plan the length, thickness, and curl of each lash with care.
- Create a beautifully balanced look that boosts each client’s natural features.
This thoughtful approach not only enhances natural beauty but also makes for a smoother application. Think of it as a detailed guide to help you through the entire process, reducing guesswork and improving outcomes.
With lash mapping, precision and creativity come together, ensuring great results every time. Whether you’re a seasoned lash artist or just getting started, mastering lash mapping opens doors to creativity and excellence.
It’s your map to creating dream lashes, ensuring happy clients and repeat visits!
Understanding Lash Mapping: A Comprehensive Guide
Lash mapping is like creating a unique map for each client’s eyes to apply extensions perfectly. Think of it as your blueprint, guiding you on where to place each lash. This strategic method not only ensures accuracy but also balances and enhances the natural beauty of the eyes.
- Personal Touch: Lash mapping lets you tailor styles to each person’s unique eye shape and preferences, making sure extensions blend effortlessly with natural lashes.
- Effective Communication: It serves as a visual guide, making chats with clients more effective. Clients can see and help decide their lash style, which builds trust and sets clear expectations.
To truly master lash mapping, you’ll need practice and an understanding of how different techniques work with eye anatomy. As you perfect this skill, your confidence grows, alongside your reputation as a skilled lash artist, delighting your clients with stunning results.
Why Lash Mapping Matters for Eyelash Extensions
Lash mapping is key to creating stunning eyelash extensions that fit each person perfectly. By understanding lash mapping, you can enhance the natural beauty of the eyes and keep your clients happy. This technique involves planning how lash extensions are added to blend with the client’s facial features and the natural flow of their lashes.
For those in the beauty industry, mastering lash mapping means offering custom lash designs tailored to each client’s unique eye shape and preferences. Lash mapping is more than a technique; it’s an art that mixes precision, personalization, and creativity. When done right, it elevates the look of eyelash extensions, giving clients a lush and seamless look that boosts their confidence.
Benefits of Lash Mapping:
- Longevity: Secure bonding of extensions promotes lasting wear.
- Health: Minimizes risk of damage or discomfort.
- Balance: Ensures a well-proportioned and even appearance.
Understanding the importance of lash mapping is vital for any eyelash technician committed to delivering excellent service and exceptional results.
Mastering the Art of Lash Mapping: Step-by-Step Guide
Mastering lash mapping involves understanding the intricacies of your client’s eye shape and their desired lash look. Here’s how to achieve exceptional results:
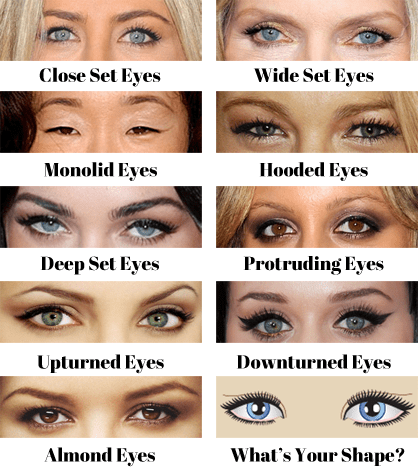
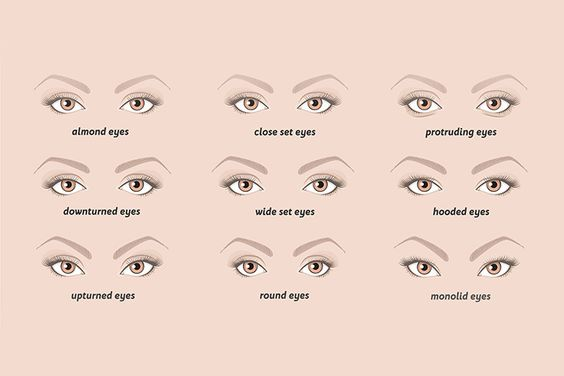
- Identify the Eye Shape: Begin by analyzing your client’s eye shape and size. Common types include almond, hooded, round, and deep-set eyes. Each shape requires a distinct lash mapping approach.
- Define the Lash Style: Discuss with your client to comprehend the look they wish to accomplish – whether it’s a dramatic volume or a natural lift. This helps in determining the length, curl, and thickness of extensions.
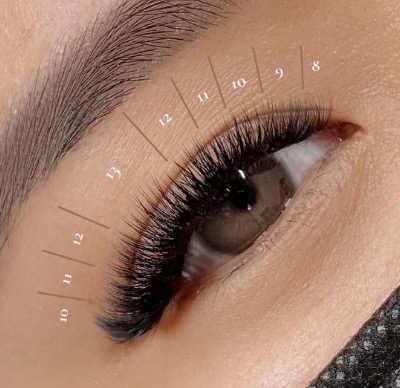
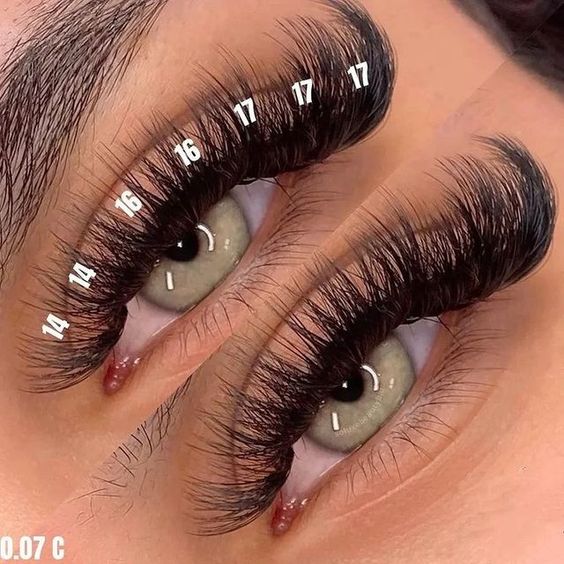
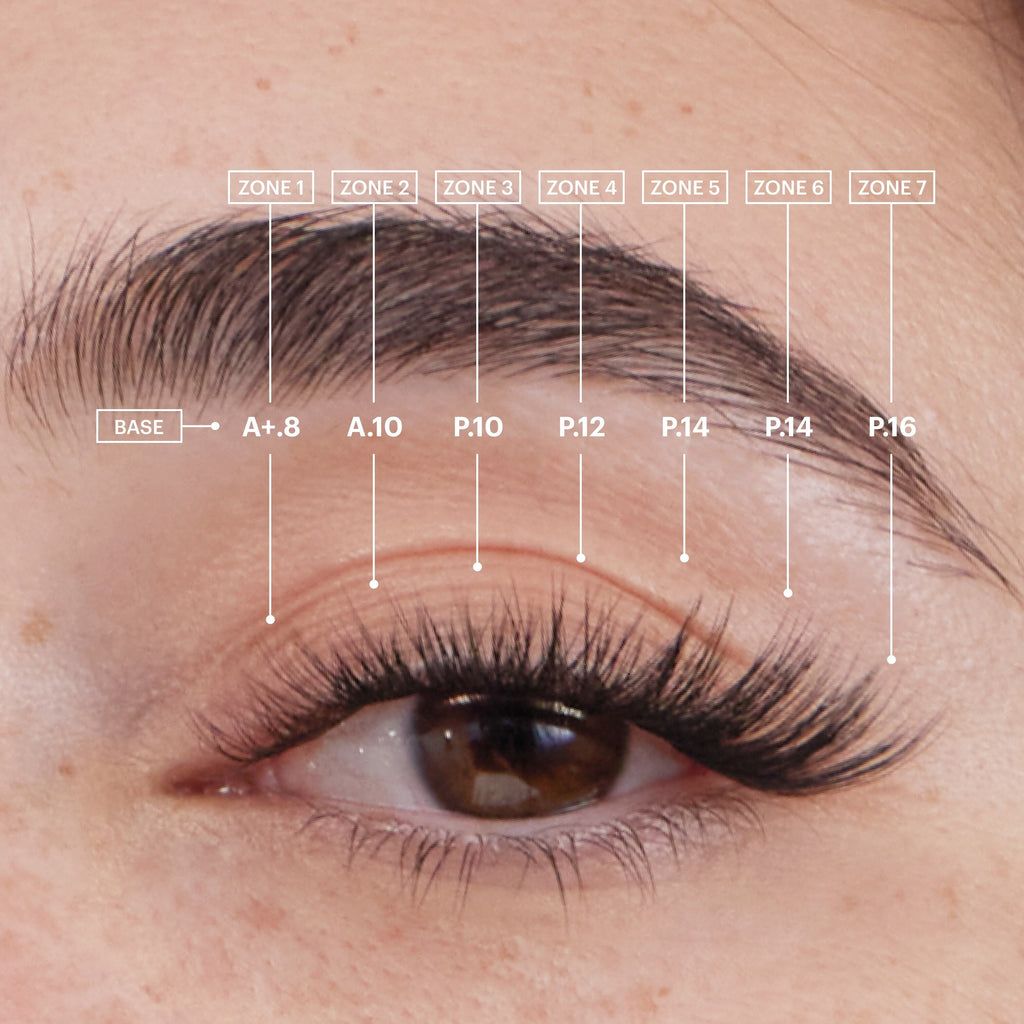
- Create a Mapping Grid: Use eye pads or eyeliner to sketch a visual layout of lash placement. Divide the eye into sections such as inner corner, middle, and outer corner, to guide accurate application.
- Select the Right Lashes: Choose extensions fitting the mapping grid and eye shape. Remember, the lash type you pick plays a crucial role in fulfilling the desired effect.
- Apply with Precision: Follow the designed map while attaching each lash extension. Ensure a strong bond between natural lashes and extensions to enhance longevity.
- Assess and Adjust: Post-application, evaluate the symmetry and fullness. Make any necessary adjustments to ensure the final look aligns perfectly with the client’s expectations.
By adhering to these systematic steps, you can elevate your artistry in lash extension application, resulting in satisfied clients and a thriving lash business.
Explore the Most Popular Lash Mapping Techniques
When it comes to eyelash extension artistry, understanding popular lash mapping techniques is crucial to cater to diverse client needs and achieve stunning results. Here are some of the most sought-after lash mapping styles you might want to master:
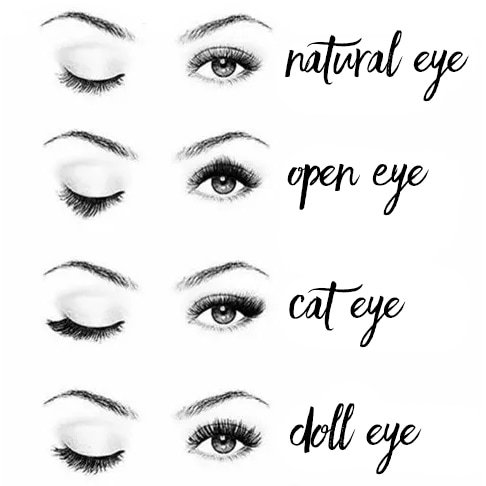
- Natural Style: Emphasizes a gentle enhancement by following the natural contours of the eye. This style is perfect for clients who prefer a subtle and effortlessly elegant look.
- Doll Eye: Known for its ability to create the illusion of larger, more vibrant eyes. By concentrating longer lashes in the center, this mapping style adds an enchanting, wide-eyed effect.
- Cat Eye: Ideal for those seeking a more dramatic flair, this technique extends the length of lashes towards the outer corners of the eyes. It’s perfect for crafting a sultry, elongated look.
- Open Eye: A versatile technique that complements most eye shapes, this map uses longer lashes on the central region of the eyelid to create an opened and brighter appearance.
These techniques are not just about aesthetics; they’re a gateway to exploring your creativity while tailoring your services to the specific desires of your clients. Experimenting with these styles allows you to understand the versatility lash mapping offers, enabling you to create show-stopping lashes for every occasion.
Tailoring Lash Maps for Unique Eye Shapes
Understanding the nuances of your clients’ unique eye shapes is essential for creating exquisite lash maps. Each eye shape, whether it’s almond, round, hooded, or monolid, presents its own set of characteristics that play a crucial role in achieving those stunning results.
To craft the perfect lash map, let’s explore some examples:
- Almond Eyes: Known for their symmetrical proportions, almond eyes lend themselves well to a variety of styles. To amplify their natural allure, opt for a cat-eye or natural lash map, emphasizing the outer corners with longer extensions.
- Round Eyes: The goal is to elongate the appearance of round eyes. Lash maps with gradual length increases towards the outer corners can create a balanced, sultry look.
- Hooded Eyes: Create a more defined lash line to avoid lashes getting lost under the eyelid’s fold. Focus on shorter lengths combined with volume to open up the eye area.
- Monolid Eyes: These eyes require a lift and curl to make lashes stand out. Use a doll eye or open-eye mapping technique to achieve a captivating effect.
When crafting lash maps, remember to assess the natural lashes’ length, curl, and thickness, ensuring your designs complement each client’s natural beauty. Customize your approach by consulting with your clients, understanding their preferences, and discussing the desired outcome. This personalized touch in mapping for various eye shapes not only enhances the visual impact but also maximizes client satisfaction.
Enhance Your Skillset: Mapping Lashes for Beginners
Beginning with lash mapping is quite the adventure. It can feel a bit overwhelming, but don’t worry—practice is your key to success. Lash mapping helps you create perfect eyelash extensions, designed just for each person. So, how do you start?
Your first move is to understand the eye’s shape and what your client wants. Every pair of eyes is different, so adjust your mapping approach as needed. Look at the shape, size, and natural direction of the lashes. This info is your base for making a map that highlights natural beauty.
Create a Simple Map: Use the eyelid as your guide. Break the lash line into parts—inner, middle, and outer. Then, pick lash curls, lengths, and thickness for each section. This helps create a balanced and beautiful result.
Experimentation is Key: Try different styles with practice strips to see what works best for various eyes. This helps you get better at mapping with time.
Remember, lash mapping is both an art and a science. The more you practice, the more natural it will feel. Before long, you’ll be able to picture the ideal lash look even before you begin. Stay curious, keep learning, and watch your skills grow!
The Essentials of Lash Mapping for Different Eye Types
Understanding the unique features of different eye shapes is key to successful lash mapping. Each shape—round, almond, hooded, or monolid—offers its own charm. Knowing these details will help you create lash styles that highlight your client’s natural beauty.
- Round Eyes: These eyes are naturally open and bright. Use cat-eye or dolly lash styles with longer lashes at the outer corners to add balance and extend the shape.
- Almond Eyes: Known for their balanced appearance, almond eyes can pull off most styles. Try open or doll eyes for a touch of elegance and symmetry.
- Hooded Eyes: With a strong brow bone, these eyes need a bit more lift. Focus on curls and lengths in the middle to open up the eye area.
- Monolid Eyes: Lacking a prominent crease, these eyes gain depth from varied curls and lengths. These layers create an illusion of dimension, enhancing their natural allure. For more details, check out this guide on curls.
Adapting your lash mapping skills to fit different eye shapes ensures every client leaves with a look that’s uniquely theirs. Remember, the trick is in both the art of mapping and appreciating each eye shape’s individuality.
Achieving Perfection: Tips for Successful Lash Mapping
Mastering lash mapping is about blending skill with creativity and understanding every client’s unique eye shape. Check out these tips:
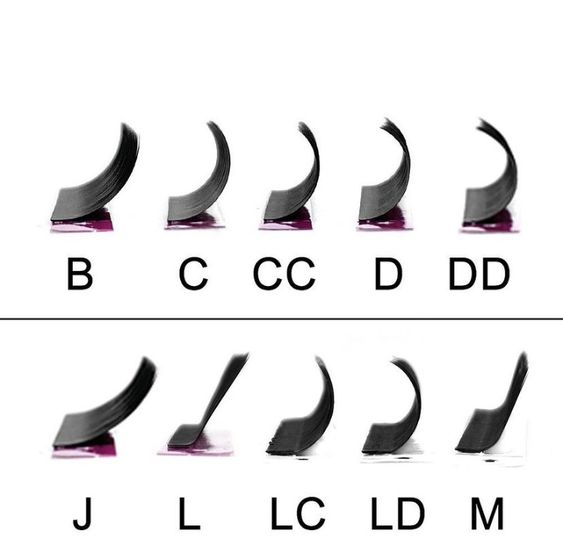
- Know Your Tools: Get familiar with different lash lengths, curls, and thicknesses. This helps you craft maps that highlight natural beauty.
- Eye Shape is Key: The first step is identifying your client’s eye shape. Tailor your approach to enhance contours, whether almond, round, or hooded.
- Discuss the Look: Talk to your client about their goals. Are they going for natural or bold? This guides your mapping choices.
- Use a Mapping Grid: Draw a simple diagram showing where each lash length goes. It keeps your application precise and uniform.
- Stay Open: Be ready to tweak your plan if needed. Listen to client feedback or adjust during application.
- Review Your Progress: Regularly check the look and symmetry. Spot inconsistencies early and adjust as needed.
Practice leads to perfection! The more you map and apply, the better you’ll get. Remember, lash mapping isn’t just a step-by-step process—it’s about enhancing beauty with thoughtful and adaptable plans.
Avoid These Common Missteps in Lash Mapping
Creating a perfect lash map means being careful and making sure every extension highlights your client’s natural beauty. Avoid these common mistakes:
- Overlooking Unique Features: Each client’s eye shape and lash length are different. Avoid using the same map for everyone to prevent disappointing results.
- Choosing Wrong Lengths: Going for long lashes every time isn’t always best. Sometimes, shorter lashes are more flattering. Keep in mind the natural lash pattern.
- Skipping Proper Consultation: Make sure to have a detailed talk with your client. Understand what they want and discuss what’s possible before starting.
- Ignoring Lash Health: Don’t only think about looks. Ensure the extension weight suits the client’s lashes to avoid damage.
- Rushing the Mapping: Take your time. Avoid gaps or overlaps in extensions by mapping with precision.
Avoiding these missteps not only leads to happy clients but also boosts your skills and reputation as a detailed lash artist.
Expert Advice: Elevating Your Lash Extension Game
Want to improve your lash extension skills? Start by mastering lash mapping. It’s not just about applying lashes; it’s about creating a look that suits each client’s unique eye shape and features. Good mapping leads to great results!
Get Quality Tools: Using the right equipment ensures each lash fits seamlessly. If you’re new to this, check out resources like ThousandLashes Lash Talk for helpful tips and fresh ideas.
Keep Practicing: Lash trends and techniques are always changing. Keep up by regularly honing your skills and trying new methods. Whether perfecting curls or balancing volume, these details make a big difference.
Remember the Basics: Focus on classic lash mapping to enhance natural eye beauty. Precision mixed with creativity can set you apart as a lash artist, ensuring happy clients and returning ones, too!
Eye Shape Matters: Customize Your Lash Mapping Approach
Understanding how to adapt lash mapping to fit each client’s unique eye shape is essential when applying eyelash extensions. Each eye shape brings its own challenges and opportunities. Let’s explore how to accentuate these natural features.
Round Eyes: These eyes are big and open, making them perfect for a cat-eye effect. By placing longer lashes towards the outer corners, you can create a more elongated look.
Almond Eyes: Known for their natural beauty and versatility, almond eyes look great with almost any style. Try the doll-eye technique, which uses longer lashes in the center to give a wide-eyed effect.
Monolid Eyes: With a flat surface and no visible crease, monolids need techniques that add dimension. Use gradual lengthening across the lash line to open them up.
Hooded Eyes: Keep lashes from getting lost under the lid by adding lift with a natural style map. Consistent length and curl help keep them visible.
Downturned Eyes: Create a lift by using a cat-eye or natural lift effect. Focus on longer, curlier lashes at the outer corners to draw the eyes upward.
Always think about the client’s natural lash length and desired look. Discuss their goals beforehand to tailor your approach and highlight their unique eye shape.
Crafting the Perfect Lash Map: A Beginner’s Blueprint
Welcome to lash mapping! As a new lash artist, creating a great lash map helps enhance your clients’ eyes beautifully and precisely. But where should you start? Think of lash mapping as your blueprint—each lash extension is planned to fit your client’s unique style.
Begin with the Basics: First, figure out your client’s eye shape—is it round, almond, or perhaps downturned? Recognizing this helps you design lashes that complement their natural beauty.
Set the Stage: Talk to your client about their ideal lash look. Do they want a soft enhancement or a bold transformation? This conversation will guide your lash map and lead to their happiness.
Create Your Map: After identifying the eye shape and desired look, sketch your map. Break the lash line into sections: the inner corner, middle, and outer corner. This step-by-step setup ensures balance and symmetry in your design.
Pick Your Style: Bring out your creative side! Popular styles include the cat eye, which lengthens the eyes, or the open eye, which creates a refreshed look. Gain more insight with practice and feel free to experiment.
More than just following steps, perfecting lash mapping combines artistry and practice. As a beginner, equip yourself with knowledge, trust your instincts, and remember: every lash set is progress toward mastery. Happy lashing!
Enhancing Your Lashes: Techniques for Every Eye Shape
Lash mapping works wonders when you understand different eye shapes! Each type brings its own charm: round, almond, hooded, and monolid all have traits that make them special. Knowing this helps you place extensions perfectly to flatter those natural contours.
- Round Eyes: These have a wider look. The cat-eye technique is your friend here! Use longer lashes on the outer edges for a sleek, elongated effect that adds definition without changing the eye’s natural beauty.
- Almond Eyes: Known for versatility, these eyes suit many styles. A doll-eye style looks great — place longer lashes in the center for natural symmetry.
- Hooded Eyes: With a fold that may hide some of the lid, go for an open-eye effect. Use longer lashes in the middle and keep the corners balanced for lift.
- Monolid Eyes: Flat and smooth without a crease, these eyes shine with a mix of curled lashes. Focus longer lashes in the middle to add depth and roundness.
Tailoring your technique to each eye type not only boosts their natural beauty but gives clients a personalized touch. Aim to enhance and compliment every feature, leaving clients glowing with confidence.

From Basic to Brilliant: Lash Mapping for Every Stylist
Lash mapping can revolutionize your work, upgrading basic applications to stunning extensions. When you master the fundamentals, you can create looks tailored to each client’s unique features, enhancing their natural beauty and confidence.
The Importance of Basic Lash Mapping
Starting with the basics helps you learn core techniques for more advanced styles. You’ll learn to recognize different eye shapes, understand how lash extensions work with natural lashes, and anticipate the final appearance.
Steps to Improve Your Lash Mapping
- Know the Eye Shape: Before you start, study the client’s eye shape. This is your guide to mapping and ensures the style flatters their features.
- Keep Your Workspace Neat: An organized space helps you focus. Precision is key for flawless lash extensions.
- Create a Mapping Plan: Think about what style your client wants. Map out the lash length, curl, and thickness. You can visualize this using colored pencils or stickers.
- Visualize the Final Outcome: With practice, you’ll quickly predict how your mapping choices affect the final look, helping you make faster and more accurate decisions.
Building your lash mapping skills takes practice, patience, and learning from each attempt. By starting with basic techniques and advancing to more complex strategies, you’re on the right path for a successful career that delivers amazing results to every client.
Unlocking Professional Lash Mapping Strategies
Unlock the Secrets! Professional lash mapping can be your key to becoming a top-tier lash artist. By using advanced strategies, you can consistently deliver stunning, custom looks that your clients will love.
Know the Eye: Get to know the eye’s anatomy. Recognize different eye shapes—like round, almond, or hooded. Understanding these shapes helps you make smart lash mapping choices tailored to each client.
Create a Lash Map Library: Develop a collection of versatile lash maps. This serves as a quick guide for different client preferences. It helps keep your work consistent and efficient.
Stay Trendy: Keep up with the latest lash trends. Whether it’s new mapping techniques or unique lash styles, staying updated ensures your skills always shine.
Use Tech Tools: Embrace technology! Digital lash mapping software lets you visualize styles on virtual models—minimizing errors and sparking creativity before actual application.
Value Feedback: Encourage client feedback. Adapt your techniques based on their experiences. This not only builds trust but shows your dedication to personalized care, fostering client loyalty.
Final Thought: With these strategies, you’re more than a lash tech; you’re creating a bespoke experience that highlights each person’s natural beauty.
Your Guide to Flawless Lash Mapping for Extensions
Creating a perfect lash map is all about skill and creativity. Focus on enhancing your client’s natural beauty with the right balance. Here’s how to boost your lash mapping finesse:
- Start with a Chat: Talk with your client about what they want. This keeps you on the same page and helps you pick the right style.
- Check Their Lashes: Look at their natural lash length, curl, and thickness. This will guide you in choosing the best extensions.
- Pick the Perfect Curl and Length: Choose extensions that look good and feel comfortable for your client’s eyes.
- Think About Eye Shape: Customize your map based on eye shapes like almond or round to enhance natural features.
- Keep It Symmetrical: Use guides to ensure both eyes match perfectly. Consistency is key!
- Blend Smoothly: Transition lash lengths and thickness naturally from inner to outer corners.
- Stay Updated: Learn new trends and techniques through workshops and online tutorials.
Master these steps to craft stunning, personalized lash looks that delight your clients. Keep practicing and learning to offer top-notch lash mapping services.
Conclusion
Ready to wrap up your lash mapping journey? Remember, practice makes perfect! By understanding various eye shapes and choosing the right techniques, you can craft gorgeous lash extensions for every client.
Want to elevate your skills? Reach out to UB Lash. Our experts are eager to provide personalized help to expand your eyelash extension techniques.
Email UB Lash now and start creating stunning lash looks for each of your clients!